
Step 1: Open the Template Builder
Step 5: Activate Your Template
What Is the Template Builder?
A template controls how Allsorter turns a candidate's resume into a branded document for your business. The Template Builder is where you create and edit Full Reformat templates directly inside Allsorter, section by section, without preparing or uploading a separate file. Every section you add pulls the matching information from the candidate's resume and redraws it into your own layout, so every formatted resume looks consistent no matter how the original was designed.
You can optionally add a cover sheet to a template — a page of candidate and recruiter details, such as expected salary or availability, that sits ahead of the reformatted resume.
Before You Start
Permissions
Building and editing templates yourself requires organisation admin or organisation manager permissions, on either a self-managed account or an account with Template Access enabled.
Important: If your account does not have Template Builder access, you will not see the option to create or edit templates. Contact the Allsorter Customer Success team, or submit a Template Request Form, and the team will build or amend the template on your behalf.
What to have ready
- Your logo (a square and a wide version work best) and brand colours, if you are building a template from scratch.
- The default font you want to use.
- A decision on which sections you want on the reformatted resume (for example Summary, Experience, Education, Skills, Certifications), in which sequence, and whether you want a cover sheet ahead of it.
How to Build a Template
Step 1: Open the Template Builder
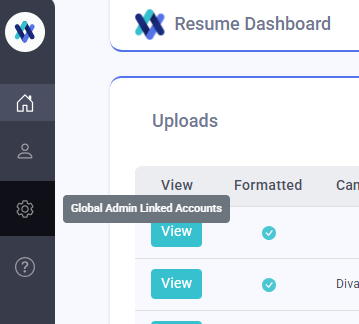
- From the Allsorter Resume Dashboard, click the gear icon (Accounts) in the left-hand sidebar to open your organisation's settings.
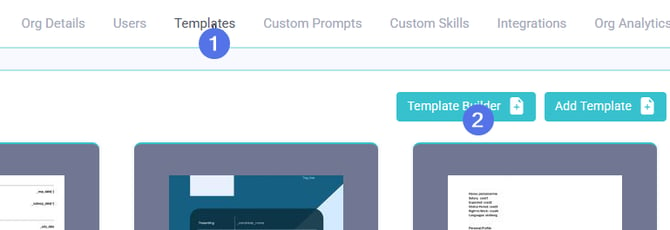
- Click the Templates tab (alongside Org Details, Users, Custom Prompts, Custom Skills, Integrations, and Org Analytics).
- On the Templates page, click Template Builder in the top right. This is separate from the Add Template button next to it, which allows you to upload a ready-made Word file directly without opening the Builder.
Step 2: Start on your template
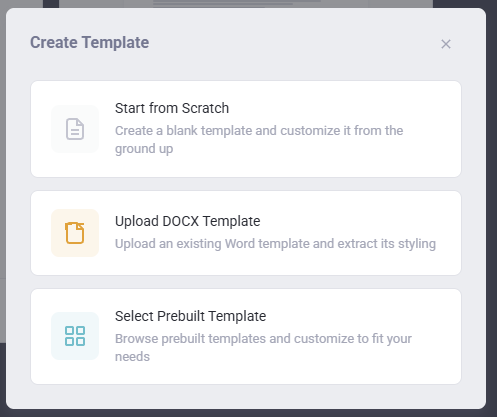
Clicking Template Builder opens a Create a Template screen with three ways to start:
- Upload DOCX Template – upload an existing Word file and the Builder extracts its styling for you to continue customising.
- Select Prebuilt Template – choose a ready-designed template from Allsorter's library, filterable by category or searchable by name. Each design shows a Preview button and a Use Template button.
See the guide below to understand how to edit a prebuilt template:
- Start from Scratch – begin with a blank template.
Whichever option you choose, a Document Setup panel opens next, where you set:
- Name – the template's name.
- Template Font – the default font for the document.
- Brand Colours – add one or more colours from your branding.
- Logos & Branding – upload a square (200×200) and/or wide (400×100) logo, or upload your branding directly from a Word file.
- Bullets – the style, size, indent, and colour of bullet points, with a Preview Bullets option to check how they look.
- Page – page size (A4 or Letter) and units (inches or centimetres).
- Margins – Narrow, Standard, Wide, or Custom.
- Cover Sheet – a toggle to include a cover sheet (see Step 4 below).
- Headers & Footers – header and footer height and text position.
If you started from a prebuilt design, these fields arrive pre-filled with that design's branding, colours, and logo placement, and you can still adjust any of them. All of these settings can also be changed later from inside the editor. When you are ready, click Continue to Editor.
Below is the interactive walkthrough for this step.
Step 3: Add resume sections
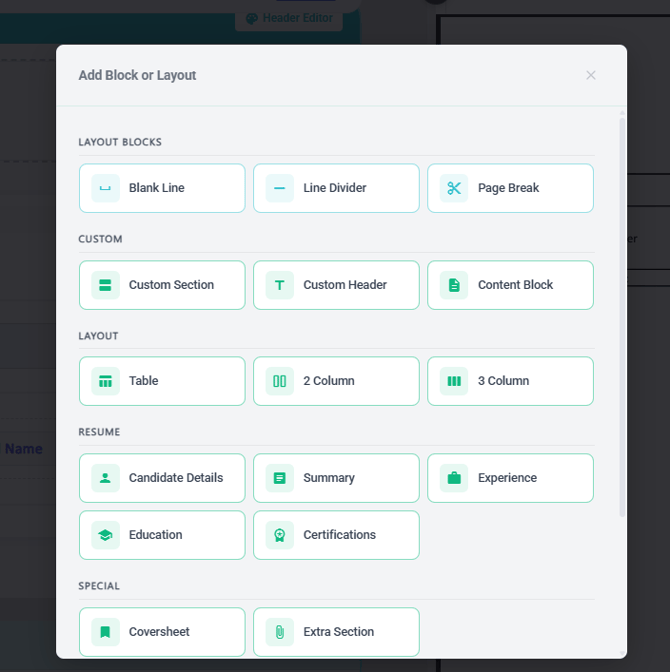
Inside the editor, the document is divided into a Document Header, Document Content, and Document Footer. Each has a "Click here or drag to add content block" area. Clicking it opens an Add Field or Layout window with these groups:
- Layout Blocks – Blank Line, Line Divider, Page Break.
- Custom – Custom Section, Custom Header, Content Block.
- Layout – Table, 2 Column, 3 Column.
- Resume – Candidate Details, Summary, Experience, Education, Certifications.
- Skills – Skill Section, Soft Skills, Professional, Tech, Languages, AI Skills.
- Special – Coversheet, Extra Section.
Clicking a section such as Experience or Education adds it to the document. Sections like Experience and Education are built to repeat automatically: add the fields you want once, and Allsorter fills in one copy of that block for every entry the candidate has, in order.
Within a section, you can:
- Click Add Field to see the fields available for that section type. For Experience, for example, this includes Employer, Job Title, Description, Full Location, City, Region, Country, Date (Start – End), Start Date, End Date, and a calculated Experience duration field. A Custom Text option is also available for anything not on the list.
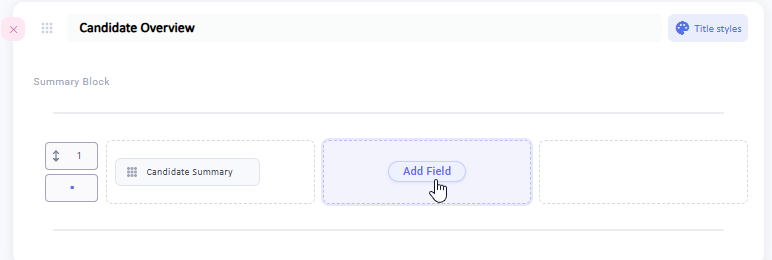
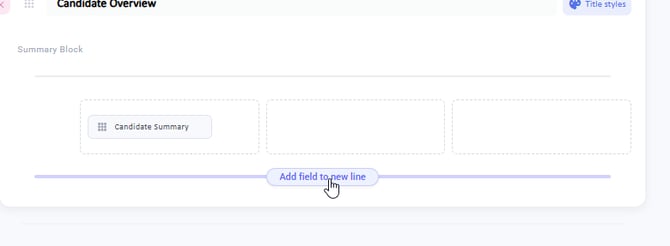
- Click the X on any field to remove it from the section.
- Drag a field or section to reorder where it sits on the page.
- Click Date Settings on a section with dates to choose how they are displayed (for example "December 2019" or "12-19"), and to set the label used for a current or ongoing entry and the separator between dates.
- Click Title styles on a section, or the small style icon above an individual field, to change its font, colour, and size.
The Preview panel on the right updates live as you build, showing exactly how the populated document will look.
Note: If a section is not added to your template, the related information will not appear in your formatted resume. You can add it at any time by opening the template in the Template Builder and updating it.
Below is the interactive walkthrough for this step.
Step 4: Add a cover sheet (optional)
A cover sheet is made up of a Coversheet Header, Coversheet Content, and Coversheet Footer. Switch on Include Coversheet in Document Setup, or from the top of the editor, to add it, and switch on Different coversheet header and footer if you want the cover sheet's header and footer to differ from the main document's.
Designing the header and footer: click Header Editor (or Footer Editor) to open the Coversheet Header Designer, a design canvas where you can:
- Add shapes (Rectangle, Circle, Line, Triangle, Star) or a Text Box.
- Upload or drop in a square or wide logo, or upload a custom image.
- Select any element to see its Shape Properties: delete, duplicate, or reset it; move it forward or back in the layer order; set its exact position (X/Y) and size (width/height); and rotate it.
- Adjust Margin Options – header/footer height, text position, and document margins.
Click Back to Template Editor to save the header or footer design and return to the main editor.
Adding candidate and recruiter details: in Coversheet Content, click the content block area to add a Custom Header or Table Block, then click Add Field to choose what appears:
- Candidate details – Full Name, First Name, Surname, Phone Number, Email, LinkedIn, Full Address, Street, City, Region, Country, Postcode, and more.
- Recruiter details – Recruiter Name, First Name, Surname, Email, Address, Position.
If you would rather lay out cover sheet information as label-and-value rows (for example Availability or Visa Status next to an open text field), add a Table Block instead. You can rename any row by editing its label, add or remove rows with the + and X icons, drag rows to reorder them, and click Table styles to format the table.
Below is the interactive walkthrough for this step.
Step 5: Activate your template
Important: Building a template does not automatically make it available for formatting resumes. You must add it to Allsorter first.
- Click Account Templates in the top right of the editor to save your work and return to your template list.
- Find your template's card. From here you can click Preview to see it, Edit to continue working on it, or use the menu to rename or manage it.
- Click Add to Allsorter on the card to make the template available for formatting resumes.
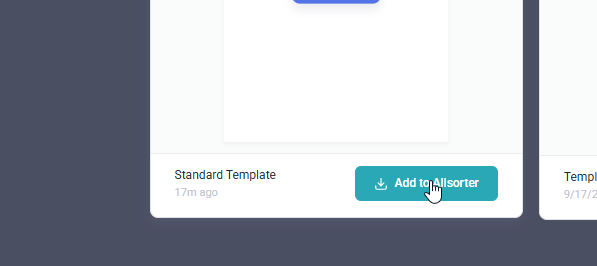
You can also click Download DOCX from Document Setup or the main editor at any time to export your template as a Word file.
To see every step above carried out together in one continuous example, starting from a prebuilt design, watch the interactive guide below.
What Happens Next
Once you click Add to Allsorter, your template appears as an option when formatting a candidate resume, in the top right corner of the screen. See Finding and Filtering Templates to learn how to locate it and filter your template list so only the templates you use regularly are visible.
Before sharing a new or edited template with your wider team, it is good practice to test it by reformatting a sample resume, to confirm that all sections and branding appear as expected.
Making Changes Later
Editing a template's content: go to Account Templates and click Edit on its card. This reopens the same Template Builder editor described above, with all of its sections, fields, and cover sheet already in place, so you can add, remove, or restyle anything. This works the same way whether the template was built from scratch, from an upload, or from a prebuilt design.
Managing a template's settings: once your template exists, you can also rename it, set a default export file suffix, and change the order sections appear in when your team edits a resume. See Managing Template Settings for details.
Troubleshooting
My new or edited template does not appear when formatting a resume
- Confirm you clicked Add to Allsorter on the template's card in Account Templates. A template that has only been built or edited, but not added, will not appear in the template picker.
- Refresh the page and check again.
- Check whether the template has been switched off in your Template Toggle. See Finding and Filtering Templates for how to check this.
- Confirm the template has been assigned to your user group. If colleagues can see a template that you cannot, contact your organisation admin and ask them to check your access.
Information is missing from my formatted resume after using a new template
If a candidate's information does not appear where you expect it, this is usually because the related section or field has not been added to the template. See What does blue highlighted text mean in Allsorter? to understand why certain information may not carry over, and how to add it back in.
I cannot see the option to create or edit a template
This usually means your account does not have Template Builder access. Confirm with your organisation admin whether your account is self-managed or has Template Access enabled. If it does not, contact the Allsorter Customer Success team, or submit a Template Request Form, and the team will build or update the template for you.
Frequently Asked Questions
Do I need any design or technical skills to use the Template Builder?
No. The Template Builder is designed to let you create and edit templates directly in Allsorter, without needing to edit a Word document yourself. You can still upload an existing Word file and extract its styling if you prefer to start from one.
Can I still ask Allsorter Customer Success to build or update a template for me?
Yes. If your account does not have Template Builder access, or you would simply prefer the Customer Success team to build or amend a template on your behalf, contact the team or submit a Template Request Form.
Does creating or editing a template use my organisation's upload credits?
No. Credits are used only when you upload and reformat a candidate resume, not when you build or edit a template.
What is the difference between a Full Reformat and a Preserve Original template?
A Full Reformat template, built here in the Template Builder, completely redesigns the candidate's resume into your branded layout. A Preserve Original template keeps the candidate's own layout and formatting while adding your branding. See Full Reformat Overview and Preserve Original Templates for more detail.
Where can I find the templates I have already created?
See Finding and Filtering Templates for where to find your templates once added to Allsorter, and how to filter the list to show only the ones you use.